If you’re a fan of Nanalan’, the beloved childhood TV show, then you’re in for a treat! A Nanalan Cake is a fun and creative way to bring nostalgia into your kitchen. Inspired by Mona, the adorable green puppet, this cake captures her whimsical charm with colorful decorations and delicious flavors.
In this guide, you’ll learn how to make a Nanalan Cake in just 30 minutes using simple ingredients and easy decorating techniques. Whether you’re celebrating a birthday, a themed party, or just craving a unique dessert, this homemade Nanalan Cake recipe will be a hit.
Get ready to bake, decorate, and enjoy this cartoon-inspired cake that’s both delicious and delightful! Let’s dive in.
Table of Contents
What Is a Nanalan Cake? (The Fun Story Behind It!)
Nanalan Cake Inspiration: A Nostalgic Treat
For many, Nanalan’ was more than just a quirky children’s TV show—it was a core memory of childhood fun and laughter. Whether you remember watching Mona’s silly adventures in her grandmother’s garden or giggling at the playful interactions with Russell the dog, the show carried a charming simplicity that stuck with fans for years. Now, the magic of Nanalan’ is making a comeback, not just in memes and nostalgia-driven conversations but in the form of a Nanalan Cake—a dessert that celebrates the show’s playful aesthetic and iconic characters.
Why a Nanalan Cake?
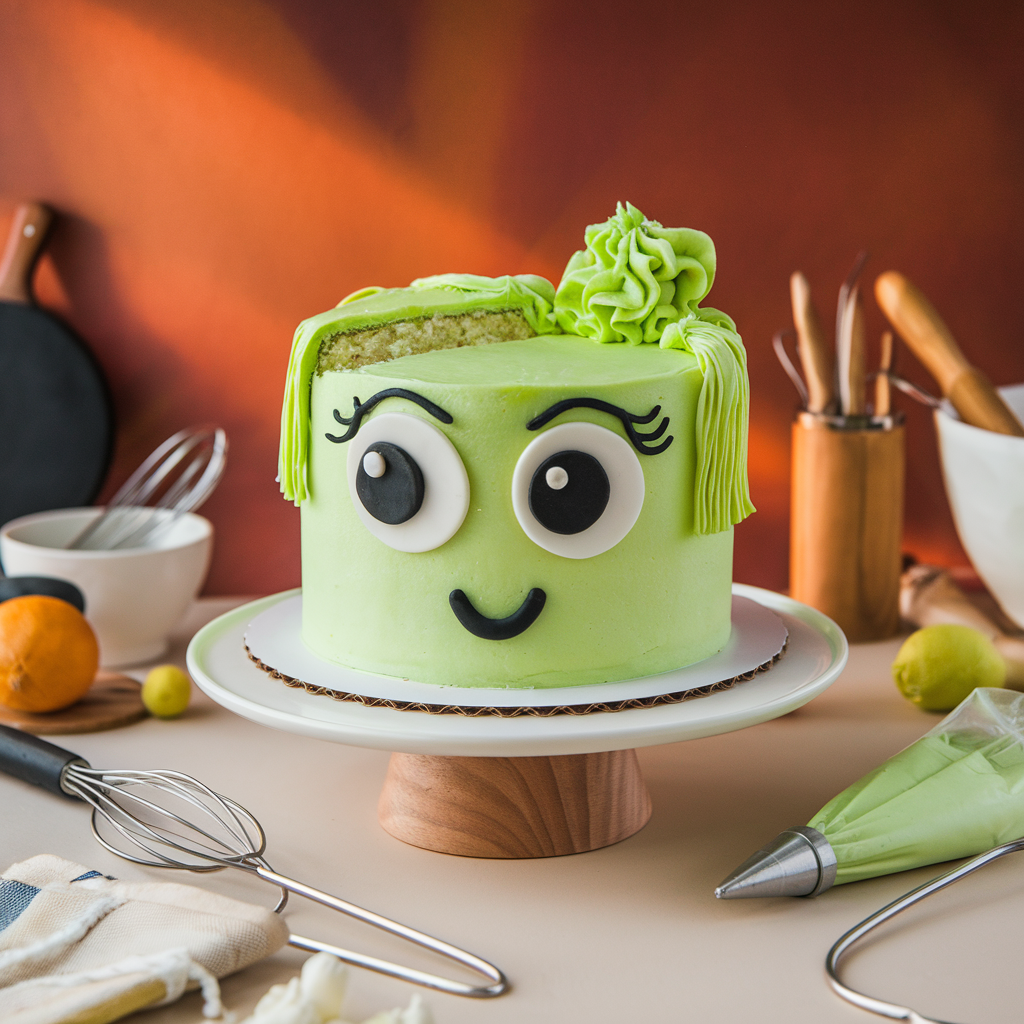
A Nanalan Cake is the perfect way to capture the essence of the show in a sweet and edible form. The show’s soft, textured puppets and bright color palette inspire a whimsical cake design that’s both fun to make and delightful to eat. Whether it’s Mona’s iconic green color, her big round eyes, or the cheerful yellow accents, this cake transforms the quirky world of Nanalan’ into a delicious dessert.
Bringing Cartoon-Inspired Desserts to Life
Cartoon-themed cakes have become a popular trend, especially with the rise of social media baking challenges and nostalgic food creations. Fans love recreating beloved childhood icons through cakes, cookies, and creative desserts—and Nanalan’ is no exception. A Nanalan Cake isn’t just a dessert; it’s a throwback to childhood joy, making it perfect for birthdays, themed parties, or just for fun.
A Fun and Easy Baking Project for All Skill Levels
The best part? You don’t need to be a professional baker to create a stunning Nanalan Cake! With a simple sponge base, vibrant food coloring, and a bit of creativity, anyone can bake and decorate this cake at home. Whether you’re a beginner baker or an expert cake decorator, the step-by-step guide in this post will help you bring Mona’s adorable character to life in a way that’s both easy and fun.
So, if you’re ready to combine nostalgia, creativity, and delicious flavors, let’s move on to the ingredients and baking process for this delightful Nanalan Cake!
Who Is Mona? (Nanalan’s Adorable Character)
If you grew up watching Nanalan’, you likely remember Mona, the quirky, wide-eyed green puppet who stole the hearts of many. As the main character of the show, Mona is a curious and playful 3-year-old who spends her days exploring her grandmother’s backyard, learning about the world, and getting into adorable mischief. Her innocent and expressive personality, combined with her unique speech patterns, made her a relatable and lovable character for children and nostalgic fans alike.
Mona’s Unique Design and Appearance
Mona’s design is simple yet memorable, making her the perfect inspiration for a Nanalan Cake. She is known for her:
- Bright green, soft-textured skin, which translates beautifully into cake decorations using green buttercream or fondant.
- Big round eyes, a key feature that can be created with white fondant circles and black food coloring or edible markers.
- Adorable tuft of yellow hair, which can be recreated using piped frosting or shaped fondant pieces.
- Wide-mouthed expressions, which can be customized with different cake decoration techniques to match her curious and playful personality.
Mona’s Role in the Nanalan’ TV Show
Mona’s adventures revolve around her imaginative and innocent view of the world, often leading to funny and heartwarming interactions with other characters. Some of her most notable traits and moments include:
- Her giggly and playful nature, which made her a beloved character among kids and parents.
- Her funny mispronunciations and simple yet profound observations about the world.
- Her love for Russell the dog, her faithful companion who joins her in her daily backyard discoveries.
- Her interactions with Nanalan’s supporting characters, including her Grandma Nana, who lovingly guides Mona through everyday lessons.
Why Mona Is the Perfect Inspiration for a Cake
Mona’s soft and vibrant features, along with her joyful and lighthearted personality, make her the perfect inspiration for a creative and whimsical cake. The Nanalan Cake captures the essence of childhood nostalgia, bringing her iconic colors, facial features, and expressive charm to life in a delicious and visually stunning dessert. Whether you’re making this cake for a themed birthday party, a nostalgic get-together, or just for fun, it’s sure to bring smiles to anyone who sees and tastes it!
Why Cartoon-Themed Cakes Are Trending
In recent years, cartoon-themed cakes have surged in popularity, becoming a favorite choice for birthdays, special occasions, and even viral social media trends. Whether inspired by classic childhood shows like Nanalan’, or popular animated characters, these cakes combine nostalgia, creativity, and artistry into a fun and delicious dessert experience. A Nanalan Cake, in particular, taps into this trend, offering both aesthetic appeal and a sentimental touch for fans of the show.
1. The Rise of Nostalgia-Driven Baking
One of the biggest reasons for the popularity of cartoon-themed cakes is the growing love for nostalgia-inspired treats. Shows like Nanalan’, SpongeBob SquarePants, and The Powerpuff Girls left a lasting impact on viewers, and recreating them in edible form brings back warm memories. Many millennials and Gen Z adults who grew up watching these cartoons now enjoy celebrating their favorite childhood icons through baking and cake decorating.
Social Media Impact: Platforms like Instagram, TikTok, and Pinterest have fueled this trend by showcasing creative and eye-catching cartoon cakes. Cakes featuring beloved characters gain traction quickly, inspiring more people to try making their own at home.
Themed Parties & Events: Nostalgia-themed parties are on the rise, and a Nanalan Cake is the perfect centerpiece for a throwback gathering, birthday, or fandom celebration.
2. The Aesthetic Appeal of Cartoon Cakes
Cartoon cakes are visually bold, colorful, and playful, making them instantly recognizable and highly shareable on social media. Some of the key aesthetic trends that make them so popular include:
Vibrant Colors: Cartoon cakes, like a Nanalan Cake, use bright food coloring to bring characters to life, making them a fun and eye-catching dessert.
Simple Yet Expressive Features: Many cartoons, including Nanalan’, have simple designs with exaggerated expressions, making them easier to recreate in cake form while still looking unique.
Fondant & Buttercream Techniques: Cake decorators now use advanced fondant sculpting, piped frosting, and edible paints to craft cakes that look like animated masterpieces.
With a Nanalan Cake, bakers can experiment with buttercream, fondant, or piped decorations to replicate Mona’s adorable green face and her signature wide-eyed look.
3. Personalization & DIY Cake Trends
Another reason why cartoon-themed cakes are trending is the rise of DIY baking. Many people love to customize their cakes, adding their own unique twists, colors, or flavors to fit personal preferences.
Customization Ideas for a Nanalan Cake:
- Personalize the cake by adding Russell the dog or Grandma Nana as extra decorations.
- Experiment with different cake flavors (vanilla, chocolate, or matcha green tea for Mona’s signature color).
- Create various expressions for Mona, such as her curious look, her silly smile, or her surprised face.
4. Viral Baking Challenges & Trends
The popularity of baking challenges has skyrocketed, and cartoon cakes are frequent contenders in online competitions. Viral trends like:
“Cartoon Cake Challenges” on TikTok
Instagram Reels of Cake Transformations
YouTube Baking Tutorials Featuring Popular Cartoon Cakes
Ingredients You’ll Need for a Nanalan Cake
Basic Ingredients for a Soft & Fluffy Cake

A Nanalan Cake isn’t just about vibrant decorations—it also needs to be soft, fluffy, and delicious. Achieving the right texture depends on using high-quality ingredients in the correct proportions. Below is a breakdown of the essential components that contribute to a moist, tender, and well-structured cake.
1. Flour: The Foundation of the Cake
Flour provides structure to the cake, but the type of flour you use significantly affects the texture.
- Cake Flour: The best option for a Nanalan Cake. It has a lower protein content (7-9%), resulting in a softer, more tender crumb.
- All-Purpose Flour: If cake flour is unavailable, all-purpose flour can be used. Sifting it well before mixing helps incorporate air for a lighter texture.
- Gluten-Free Flour: A 1:1 gluten-free baking mix works as a substitute, provided it includes xanthan gum for stability.
To make a DIY cake flour substitute, measure 1 cup of all-purpose flour, remove 2 tablespoons, and replace them with 2 tablespoons of cornstarch. Sift the mixture several times for even distribution.
2. Leavening Agents: The Secret to a Fluffy Cake
Leavening agents create air pockets that make the cake rise, resulting in a light and airy texture.
- Baking Powder: A double-acting leavening agent that helps the cake rise during baking.
- Baking Soda: Works with acidic ingredients like buttermilk or lemon juice to create a strong lift.
Always use fresh baking powder and baking soda, as expired leavening agents lose their effectiveness and result in a dense cake.
3. Sugar: Adding Sweetness and Structure
Sugar plays a crucial role in tenderizing the cake and retaining moisture.
- Granulated Sugar: The most common type, ensuring a light texture when creamed with butter.
- Brown Sugar: Adds moisture and a slight caramel flavor due to its molasses content.
- Powdered Sugar: Used mainly for frosting but can also be dusted over the cake for a decorative touch.
For the best texture, cream sugar with butter until the mixture is light and fluffy. This process aerates the batter, leading to a softer crumb.
4. Fats: Ensuring Moisture and Tenderness
Fats contribute to the cake’s richness, moisture, and tenderness.
- Unsalted Butter: Enhances flavor while creating a tender crumb.
- Vegetable Oil: Helps retain moisture since oil remains liquid at room temperature.
- Greek Yogurt or Sour Cream: Adds extra moisture and a slight tang for depth of flavor.
For a balance of flavor and moisture, a combination of butter and oil works well. If replacing butter with oil, use a 1:1 ratio and add a teaspoon of vanilla extract to maintain a rich aroma.
5. Eggs: The Binding and Structure Element
Eggs contribute to the cake’s stability and richness.
- Whole Eggs: Provide moisture and structure, ensuring a well-balanced texture.
- Egg Whites: Can be whipped separately and folded into the batter for extra fluffiness.
- Egg Yolks: Add richness and tenderness to the cake.
Using room-temperature eggs ensures they mix evenly with the batter, preventing lumps and promoting a uniform texture.
6. Dairy and Liquids: Keeping the Cake Soft and Moist
Liquids, particularly dairy products, play an essential role in maintaining moisture.
- Whole Milk: Helps create a smooth batter with a rich taste.
- Buttermilk: Its acidity reacts with baking soda, producing a tender crumb.
- Heavy Cream: Primarily used for frosting but can be added to the batter for extra richness.
If buttermilk is unavailable, make a substitute by mixing 1 tablespoon of vinegar or lemon juice with 1 cup of milk. Let it sit for five minutes before using.
7. Vanilla and Flavor Enhancers: Elevating the Taste
Flavoring agents enhance the overall taste of the cake.
- Pure Vanilla Extract: Adds a natural sweetness and depth of flavor.
- Almond Extract: Complements vanilla for a more complex taste.
- Citrus Zest: A touch of lemon or orange zest brightens the cake’s flavor.
Using high-quality pure vanilla extract instead of imitation ensures a richer and more authentic taste.
Food Coloring & Fondant for the Perfect Look
A Nanalan Cake is more than just a delicious dessert—it’s a fun and visually striking creation inspired by the beloved character, Mona. To bring her playful green face and expressive features to life, the right combination of food coloring and fondant is essential. These elements ensure the cake captures Mona’s signature look while remaining vibrant, smooth, and professional in presentation.
1. Choosing the Right Food Coloring for a Bold and Vibrant Cake
The bright, bold colors of a Nanalan Cake require high-quality food coloring that delivers intense pigmentation without altering the cake’s texture or taste.
Types of Food Coloring:
- Gel Food Coloring: Highly concentrated and ideal for achieving deep, vibrant colors without adding excess liquid. A small amount goes a long way.
- Liquid Food Coloring: More commonly found in grocery stores but less concentrated than gel. It may require larger quantities to reach the desired shade.
- Powdered Food Coloring: A great choice for fondant and buttercream, as it offers strong pigmentation without changing consistency.
- Natural Food Coloring: For those looking for a more natural option, ingredients like matcha powder (for green), turmeric (for yellow), and beet powder (for red) can be used.
Best Colors for a Nanalan Cake:
To accurately recreate Mona’s appearance, use the following shades:
- Green: The dominant color for Mona’s face. A mix of leaf green or electric green gel coloring works best.
- Yellow: Used for Mona’s hair tuft and accents. Lemon yellow gel coloring provides a bright, sunny effect.
- White & Black: Essential for Mona’s big round eyes and pupil details. White fondant is typically used, while black can be achieved with black gel coloring or edible marker pens.
Pro Tip: Always start with a small amount of food coloring and gradually add more to avoid oversaturating the batter or frosting.
2. Using Fondant for a Smooth, Professional Finish
Fondant is a versatile cake decorating material that allows bakers to create precise shapes, smooth surfaces, and character details. For a Nanalan Cake, fondant can be used to achieve Mona’s facial features, hair, and distinctive round eyes.
Types of Fondant:
- Store-Bought Fondant: Ready to use and comes in multiple colors, making it convenient for beginners. Popular brands include Satin Ice, Wilton, and FondX.
- Homemade Marshmallow Fondant: A budget-friendly alternative made from melted marshmallows and powdered sugar, offering a softer, more pliable texture.
How to Work with Fondant:
- Kneading & Coloring:
- Start by kneading the fondant to soften it.
- If using white fondant, add a few drops of gel food coloring and knead until the color is fully blended.
- Rolling & Shaping:
- Dust your work surface with cornstarch or powdered sugar to prevent sticking.
- Roll out the fondant evenly to about 1/8 inch thick before placing it over the cake.
- Applying to the Cake:
- Gently lift the rolled fondant and drape it over a crumb-coated cake (a thin buttercream layer applied to hold crumbs).
- Smooth it out using a fondant smoother or clean hands, working from the top down to avoid air bubbles.
- Cutting & Attaching Features:
- Use cookie cutters, small knives, or fondant tools to shape Mona’s eyes, mouth, and other facial features.
- Attach pieces using a tiny amount of water or edible glue to help them stick.
Pro Tip: Fondant dries quickly, so cover any unused portions with plastic wrap to keep it from hardening.
3. Buttercream vs. Fondant: Which One Should You Use?
While fondant provides a smooth and polished look, some bakers prefer buttercream frosting for its rich flavor and softer texture. Both have their pros and cons when decorating a Nanalan Cake.
| Feature | Fondant | Buttercream |
|---|---|---|
| Texture | Smooth, firm finish | Soft, creamy, and spreadable |
| Flavor | Sweet but slightly chewy | Rich, buttery, and flavorful |
| Ease of Use | Requires rolling and shaping | Easier to spread and pipe |
| Best for | Detailed designs & smooth finish | Rustic or piped decorations |
| Durability | Holds shape well for hours | Can melt in warm conditions |
If you want a cartoon-accurate look, fondant is the best choice. However, if you prefer a softer texture and easier application, opt for buttercream and use a piping bag to create Mona’s facial details.
4. Decorating Tips to Bring Your Nanalan Cake to Life
Now that the coloring and fondant are ready, here are some final decoration techniques to make your Nanalan Cake stand out:
- For a Fluffy Hair Effect: Instead of fondant, use a grass piping tip with yellow buttercream to create Mona’s signature tuft of hair.
- For Expressive Eyes: Use white fondant for the base, black gel coloring for the pupils, and a tiny white dot for highlights to give Mona’s eyes a lively expression.
- For a More Playful Look: Experiment with different facial expressions, like Mona’s happy smile, surprised look, or mischievous grin.
Best Baking Tools for a Professional Finish
Creating a Nanalan Cake with a smooth, fluffy texture and a perfectly decorated finish requires more than just quality ingredients. The right baking tools can make the entire process easier, more efficient, and result in a polished, professional-looking cake. From mixing the batter to applying fondant and decorative details, having the right equipment ensures precision, consistency, and better results. Below are the essential baking tools that will help you achieve a professional finish when making a Nanalan Cake.
1. Cake Pans: The Foundation of a Well-Shaped Cake
The shape and structure of your cake start with using the right cake pan. A Nanalan Cake typically features a round, dome-like appearance, so choosing the correct pan is essential.
Recommended Cake Pans:
- 8-Inch or 9-Inch Round Cake Pans – Ideal for creating a standard round-shaped cake that provides a stable base for decoration.
- Dome-Shaped Cake Pan (Hemispherical Mold) – Perfect for replicating Mona’s rounded head shape. These molds allow for a 3D effect without excessive carving.
- Springform Pans – Useful for easier cake removal without damaging the edges.
Pro Tip: Always grease and flour the cake pan or use parchment paper liners to prevent sticking and ensure easy cake removal.
2. Stand Mixer or Hand Mixer: Achieving a Smooth Batter
A smooth, lump-free cake batter is crucial for a soft and fluffy texture. While hand mixing can work, using a stand mixer or hand mixer ensures better aeration and a more evenly mixed batter.
- Stand Mixer – A great choice for bakers who frequently bake. The consistent mixing speed allows for better ingredient incorporation, especially when creaming butter and sugar.
- Hand Mixer – A budget-friendly and space-saving alternative that still offers great results. Perfect for mixing cake batter, whipping egg whites, and making buttercream frosting.
Pro Tip: Start mixing at low speed to prevent flour from flying out, then gradually increase to medium speed for a well-mixed batter.
3. Measuring Tools: Ensuring Accuracy for Perfect Results
Baking is a science, and precision is key. Using proper measuring tools prevents errors and ensures that each ingredient is added in the correct proportion.
Essential Measuring Tools:
- Measuring Cups & Spoons – Used for accurately measuring dry and liquid ingredients. Always level off dry ingredients for exact measurements.
- Digital Kitchen Scale – Weighing ingredients provides more accuracy than volume measurements, especially for flour, sugar, and butter.
- Liquid Measuring Cup – Unlike dry measuring cups, these have clear markings for measuring milk, buttermilk, and oil.
Pro Tip: Always use a spoon-and-level method for measuring flour instead of scooping directly from the bag to avoid compacting, which can lead to a dense cake.
4. Offset Spatula & Cake Scraper: Achieving a Smooth Finish
A Nanalan Cake requires a smooth base before adding decorations, whether using buttercream or fondant. These tools help achieve a flawless surface.
- Offset Spatula – A must-have tool for spreading and smoothing frosting evenly over the cake layers.
- Cake Scraper (Bench Scraper) – Helps create perfectly smooth edges on buttercream-covered cakes. Works best when used with a turntable for an even application.
Pro Tip: Dip the offset spatula in warm water, then wipe it dry before smoothing buttercream for a silky, clean finish.
5. Cake Turntable: Easy & Even Decorating
A cake turntable makes the decorating process more efficient and precise. It allows you to rotate the cake smoothly while applying frosting or fondant, ensuring even coverage.
- Revolving Cake Stand – A rotating turntable makes it easy to spread buttercream, smooth out fondant, and create clean designs.
- Non-Slip Base – Ensures stability, preventing the cake from shifting while decorating.
Pro Tip: When working with fondant, use a turntable to help roll and position the fondant evenly across the cake.
6. Piping Bags & Nozzles: Creating Detailed Decorations
For bakers who prefer using buttercream frosting instead of fondant, piping bags and decorating tips are essential for creating textures and intricate designs on the cake.
Must-Have Piping Tips for a Nanalan Cake:
- Round Tip (#1 or #2) – Ideal for outlining Mona’s facial features and eyes.
- Grass Tip (#233) – Perfect for creating Mona’s textured hair using yellow buttercream.
- Star Tip (#16 or #32) – Used for adding dimension and extra decoration details.
Pro Tip: To avoid color bleeding when using multiple frosting colors, chill each colored buttercream before piping to help maintain clean lines.
7. Fondant Tools: Shaping & Designing Mona’s Face
Fondant is the best way to achieve Mona’s cartoon-like appearance, and the right tools help shape and place fondant precisely.
- Rolling Pin (Non-Stick) – Used for rolling out fondant to an even thickness.
- Fondant Cutter or X-Acto Knife – Helps cut out precise shapes for Mona’s eyes, mouth, and details.
- Ball Tool & Modeling Tools – Essential for adding fine details and facial features.
- Edible Glue or Water Brush – Helps attach fondant pieces securely.
Pro Tip: Dust your rolling pin and work surface with cornstarch or powdered sugar to prevent fondant from sticking.
8. Cooling Rack: Preventing a Soggy Cake
Properly cooling a cake before frosting is essential to prevent buttercream from melting and fondant from becoming sticky.
- Wire Cooling Rack – Allows air to circulate around the cake, cooling it evenly and preventing condensation.
Pro Tip: Never frost or decorate a warm cake. Let it cool completely at room temperature before assembling.
9. Cake Leveler: Ensuring Even Layers
For cakes with multiple layers, a cake leveler or serrated knife ensures each layer is even and uniform for a professional look.
- Adjustable Cake Leveler – Allows for precise trimming and helps create flat, even cake layers.
- Serrated Bread Knife – Works as an alternative for manually leveling layers.
Pro Tip: Always trim cakes after they have completely cooled to prevent tearing.
10. Baking Thermometer: Achieving the Perfect Bake
A cake thermometer ensures the cake is fully baked without being overdone.
- Instant-Read Thermometer – Inserted into the center of the cake, it should read 200-210°F (93-99°C) when fully baked.
Pro Tip: If you don’t have a thermometer, use the toothpick test—insert a toothpick into the center, and if it comes out clean, the cake is ready.
Step-by-Step Guide: How to Make a Nanalan Cake
Preparing the Cake Batter for a Light Texture
Achieving a soft, fluffy, and light cake texture begins with properly preparing the batter. The way ingredients are measured, mixed, and incorporated significantly impacts the final outcome of your Nanalan Cake. By following a precise mixing method and using the right techniques, you can create a batter that results in a cake that is tender, moist, and airy.
1. Measuring Ingredients Accurately for the Perfect Balance
Baking is a science, and precise measurements are key to achieving the right texture. Using too much flour can lead to a dense cake, while too much liquid can make it too soft and unstable.
Essential Measurement Tips:
- Use a digital scale for accuracy, as weighing ingredients ensures precision.
- For flour, use the spoon-and-level method to avoid compacting the flour, which can result in a dry cake.
- Measure liquid ingredients at eye level using a clear measuring cup to prevent overpouring.
Pro Tip: Avoid estimating ingredient amounts, as even slight variations can alter the cake’s texture.
2. Creaming Butter and Sugar for Airy Results
One of the most important steps in preparing cake batter is the creaming process, where butter and sugar are beaten together to incorporate air. This step creates a light and airy texture while giving the cake a tender crumb.
Steps for Creaming Butter and Sugar Correctly:
- Use room-temperature butter – Soft but not melted butter ensures proper aeration.
- Beat butter and sugar together for 3-5 minutes on medium-high speed until the mixture is light, fluffy, and pale in color.
- Scrape down the bowl occasionally to ensure even mixing.
Pro Tip: Over-creaming can cause the butter to break down, leading to an oily batter, while under-creaming results in a dense cake. The mixture should appear fluffy and well-blended before moving to the next step.
3. Incorporating Eggs One at a Time for a Stable Batter
Eggs play a vital role in binding ingredients, adding moisture, and helping with leavening. Adding them properly ensures a smooth, well-emulsified batter.
Steps for Adding Eggs Correctly:
- Use room-temperature eggs, as cold eggs can cause the butter mixture to curdle.
- Add eggs one at a time, beating on low speed after each addition until fully incorporated.
- Mix just until combined to avoid overmixing, which can toughen the cake.
Pro Tip: If the batter looks slightly curdled after adding eggs, don’t worry—this will smooth out once the dry and wet ingredients are incorporated.
4. Mixing Dry Ingredients for Even Distribution
A properly blended dry ingredient mixture ensures a uniform cake texture. The dry ingredients should be combined before being added to the wet ingredients to prevent uneven mixing or clumps.
Steps for Mixing Dry Ingredients:
- Sift together the flour, baking powder, and salt to evenly distribute the leavening agents.
- Use a whisk to combine the ingredients for a lump-free, airy mixture.
- Gradually add the dry ingredients to the wet mixture to avoid overloading the batter.
Pro Tip: Sifting the flour twice creates a lighter batter by incorporating more air.
5. Alternating Wet and Dry Ingredients for the Right Consistency
To achieve a smooth, evenly mixed batter, the dry and wet ingredients should be added alternately rather than all at once. This prevents overmixing and ensures an even distribution of ingredients.
Step-by-Step Alternation Method:
- Start with dry ingredients – Add ⅓ of the dry mixture and mix on low speed.
- Add part of the wet ingredients (milk, buttermilk, or other liquid) and mix gently.
- Repeat the process – Continue alternating dry and wet ingredients, finishing with dry ingredients.
Pro Tip: Mixing on low speed or using a spatula for the final incorporation prevents overworking the gluten, which could lead to a tough cake.
6. Folding the Batter for Extra Airiness
Once all ingredients are combined, a final gentle folding technique ensures the batter remains light and airy.
How to Properly Fold Cake Batter:
- Use a rubber spatula to gently fold the batter in a sweeping motion.
- Avoid stirring vigorously, as this can knock out the air pockets created during mixing.
- Fold just until the batter looks smooth and uniform.
Pro Tip: Over-mixing at this stage can deflate the batter, leading to a dense cake. A few streaks of flour are okay, as they will incorporate naturally during baking.
7. Checking Batter Consistency Before Baking
Before pouring the batter into the cake pan, checking the consistency ensures that the cake will rise properly and have the right texture.
Ideal Cake Batter Consistency:
- The batter should be smooth and thick but still pourable.
- It should slowly fall off a spatula rather than being too runny or too thick.
- If the batter appears too thick, add a tablespoon of milk to loosen it slightly.
Pro Tip: Avoid adding extra flour if the batter seems thin, as this can lead to a dense cake. Instead, check that the wet-to-dry ratio is correct.
Baking the Cake: The 30-Minute Method
Now that the Nanalan Cake batter is ready, the next step is baking it to perfection. The key to achieving a cake that is moist, evenly baked, and light in texture lies in proper temperature control, the right baking techniques, and timing. This 30-minute baking method ensures that your cake bakes quickly and evenly, making it a perfect recipe for both beginners and experienced bakers.
1. Preheating the Oven for Consistent Baking
Before placing the cake in the oven, it’s essential to preheat it to the correct temperature. A well-preheated oven ensures even heat distribution, which helps the cake rise properly without overcooking on the outside.
Steps for Preheating the Oven Properly:
- Set the oven temperature to 350°F (175°C) for a balanced bake.
- Preheat for at least 10-15 minutes before putting the cake in.
- Use an oven thermometer to ensure accuracy, as some ovens can run hotter or cooler than the set temperature.
Pro Tip: A properly preheated oven prevents a dense or undercooked center, which can happen if the cake is placed in an oven that is still warming up.
2. Preparing the Cake Pans for a Non-Stick Bake
To prevent the cake from sticking to the pan and ensure an easy release, it’s important to prepare the cake pans correctly.
How to Prepare Cake Pans for a Perfect Release:
- Grease the Pan: Use butter, baking spray, or shortening to coat the bottom and sides of the pan evenly.
- Dust with Flour or Cocoa Powder: Lightly dusting the pan with flour (for vanilla cakes) or cocoa powder (for chocolate cakes) helps create a barrier between the batter and the pan.
- Use Parchment Paper: Lining the bottom of the cake pan with parchment paper ensures a completely non-stick surface, making cake removal effortless.
Pro Tip: If using dome-shaped cake molds to mimic Mona’s round face, grease them well and dust them lightly to avoid any breakage when unmolding.
3. Pouring the Batter Evenly for a Balanced Rise
An evenly distributed cake batter ensures that the cake rises uniformly and doesn’t develop uneven domes or cracks.
Steps for Proper Batter Distribution:
- Divide the batter equally between the cake pans to ensure even baking.
- Tap the cake pans gently on the counter to remove air bubbles and level out the batter.
- Use an offset spatula to smooth the top of the batter for an even surface.
Pro Tip: For a Nanalan Cake, using a hemispherical cake mold helps create a rounded shape for Mona’s head without excessive carving after baking.
4. Baking the Cake for the Right Time and Temperature
Now that the cake pans are ready, it’s time to bake using the 30-minute method.
Step-by-Step Guide to Baking the Cake:
- Place the cake pans on the middle rack of the preheated oven. This ensures even heat distribution and prevents overbaking on one side.
- Bake at 350°F (175°C) for 25-30 minutes, depending on the size of the cake pans.
- For standard 8-inch round cakes: Bake for 28-30 minutes.
- For dome-shaped cake molds: Bake for 30-32 minutes, as thicker cakes take longer to cook.
- Avoid opening the oven door too early to prevent sudden temperature drops, which can cause the cake to collapse.
- Rotate the cake pans after 20 minutes if your oven has uneven heating spots.
Pro Tip: If baking multiple cake layers, ensure that there is enough space between pans for proper airflow, allowing them to bake evenly.
5. Testing for Doneness: How to Know When the Cake Is Ready
A perfectly baked Nanalan Cake should be golden brown on the surface, light to the touch, and fully set in the center. Here’s how to check if your cake is done:
Three Ways to Check Cake Doneness:
- Toothpick Test: Insert a toothpick into the center of the cake. If it comes out clean or with a few moist crumbs, the cake is ready.
- Spring-Back Test: Lightly press the top of the cake with your fingertip. If it springs back without leaving an indentation, it’s fully baked.
- Internal Temperature Check: Using an instant-read thermometer, the cake should register 200-210°F (93-99°C) in the center when fully baked.
Pro Tip: If the cake is browning too quickly on the top but still undercooked inside, loosely cover it with aluminum foil for the last 5-10 minutes of baking.
6. Cooling the Cake for a Perfect Texture
Cooling the cake properly is just as important as baking. A cake that is removed from the pan too early can fall apart, while cooling it too long in the pan can make the edges soggy.
Steps for Proper Cake Cooling:
- Let the cake cool in the pan for 10 minutes before attempting to remove it.
- Run a knife around the edges to loosen the cake from the pan if necessary.
- Transfer the cake onto a wire cooling rack to allow air circulation and prevent excess moisture buildup.
- Let the cake cool completely (about 1 hour) before decorating to prevent melted frosting or fondant from slipping.
Pro Tip: If you’re in a rush, you can place the cake in the refrigerator for 15-20 minutes after it has cooled slightly at room temperature. This helps firm it up quickly for decorating.
7. Storing the Cake Layers Before Assembly
If you’re not decorating the cake immediately, storing it properly keeps it fresh and prevents it from drying out.
Storage Options for Cake Layers:
- Short-Term Storage: Wrap the cooled cake layers in plastic wrap and keep them at room temperature for up to 24 hours.
- Refrigeration: Store wrapped cake layers in an airtight container in the fridge for up to 3 days.
- Freezing: If making the cake in advance, freeze wrapped layers in a freezer-safe bag for up to 3 months.
Pro Tip: If freezing, place parchment paper between cake layers to prevent them from sticking together. Thaw at room temperature before decorating.
Cooling & Prepping for Decoration
Once your Nanalan Cake has finished baking, the next critical step is cooling and preparing it for decoration. Rushing this process can lead to frosting melting, uneven cake layers, or a collapsed structure. To ensure your Nanalan Cake is picture-perfect and holds its shape, proper cooling and preparation are essential. A well-prepped cake results in a smooth, professional finish that enhances the overall look and texture of your Nanalan Cake.
1. Why Cooling Is Essential for a Perfect Nanalan Cake
Cooling is often an overlooked step, but it plays a major role in maintaining the moisture, texture, and structural integrity of the cake. A properly cooled Nanalan Cake will:
- Prevent frosting from melting – Applying buttercream or fondant to a warm cake causes it to soften or slide off, ruining the design.
- Retain its light and fluffy texture – Cooling allows the cake to set, keeping it moist yet stable.
- Ensure an even surface for decorating – If a cake is not fully cooled before decorating, it may cause uneven layers or sinking in the center.
- Make slicing and stacking easier – When the cake is firm, it holds up better to layering, trimming, and stacking, making decorating a smoother process.
2. Step-by-Step Cooling Process for a Stable Nanalan Cake
Step 1: Let the Cake Rest in the Pan (Initial Cooling)
- As soon as you remove the cake from the oven, allow it to rest in the pan for 10-15 minutes.
- This allows the cake to slightly firm up before handling, preventing it from breaking apart when removed.
- Use a butter knife or offset spatula to gently loosen the edges if the cake appears stuck to the pan.
Step 2: Transfer to a Wire Rack for Even Cooling
- After the initial cooling period, carefully invert the cake onto a wire rack.
- A wire cooling rack allows air to circulate around the cake, preventing condensation from forming at the bottom.
- Let the cake cool at room temperature for at least 1 to 2 hours before moving forward with decoration.
Step 3: Refrigerating the Cake for a Firmer Texture
- Once completely cooled, wrap the Nanalan Cake tightly in plastic wrap to lock in moisture.
- Place the cake in the refrigerator for 30 to 60 minutes to make it easier to handle and decorate.
- A chilled cake is less likely to crumble, making it perfect for applying buttercream or fondant.
If you need to store the cake for a longer period before decorating, you can keep it in the refrigerator overnight. For extended storage, freeze the cake by wrapping it in two layers of plastic wrap and aluminum foil, ensuring it remains fresh for up to three months.
3. Trimming and Leveling for a Professional Look
A perfect Nanalan Cake should have a smooth and even surface for easy frosting and decorating. If the cake has developed a domed top during baking, trimming is necessary to create a flat and even surface.
Step 1: Leveling the Cake Layers
- Place the cake on a turntable or a flat surface.
- Use a long serrated knife or cake leveler to gently trim the domed top, slicing horizontally to achieve an even layer.
- If making a layered Nanalan Cake, cut the cake into two or three equal sections to allow for fillings between layers.
Step 2: Removing Excess Crumbs
- After trimming, use a pastry brush or your hands to remove any loose crumbs.
- Eliminating crumbs helps prevent them from mixing into the frosting, keeping the final decoration clean.
4. Applying a Crumb Coat for a Clean and Polished Finish
A crumb coat is a thin layer of frosting applied to seal in crumbs before the final decoration. This is an essential step for achieving a smooth and flawless surface on your Nanalan Cake.
Step 1: Apply a Thin Layer of Frosting
- Spread a thin layer of buttercream or frosting over the cake using an offset spatula.
- Make sure the crumb coat is light and even, just enough to trap the crumbs without making the cake too thickly coated.
Step 2: Chill the Cake Again
- Place the crumb-coated cake in the refrigerator for 20-30 minutes until the frosting is firm.
- This sets the crumb coat, making it easier to apply the final layer of frosting or fondant.
A well-executed crumb coat ensures that fondant or buttercream adheres smoothly, giving the cake a professional and polished look.
5. Prepping for Decoration: Fondant vs. Buttercream
At this stage, the Nanalan Cake is fully cooled, trimmed, and crumb-coated, making it ready for decoration. Choosing between fondant or buttercream will determine the final appearance of the cake.
Using Fondant for a Smooth Finish
- Fondant works best for creating Mona’s cartoon-like features, providing a clean and structured look.
- Roll out green fondant to cover the cake, smoothing out any air bubbles for a seamless design.
- Use white and black fondant cutouts to create Mona’s big round eyes and expressive features.
- Yellow fondant pieces can be used for her signature tuft of hair, placed on the top of the cake.
Using Buttercream for a Soft and Textured Look
- If you prefer a softer, more homemade texture, buttercream is the best option.
- Color the frosting with gel-based food coloring to achieve Mona’s bright green shade.
- Use a piping bag with a star tip to add texture, especially for Mona’s hair and facial details.
Whether using fondant or buttercream, ensure that each layer is applied evenly and smoothly, so the Nanalan Cake captures Mona’s adorable and whimsical personality.
6. Additional Prepping Tips for a Perfect Nanalan Cake
- Use a Cake Turntable for Even Frosting – A turntable makes smoothing buttercream and applying fondant much easier.
- Chill Between Decoration Steps – Keeping the cake cold between layers of frosting ensures it remains firm and easy to work with.
- Practice on a Scrap Piece Before Decorating – If using piping bags for facial details, practice first on parchment paper to get the design right before applying it to the cake.
Decorating Your Nanalan Cake Like a Pro
How to Achieve Mona’s Green & Yellow Look
One of the most defining features of a Nanalan Cake is its bright green and yellow color scheme, reflecting Mona’s signature look from the show. To create a cake that perfectly captures Mona’s playful and whimsical personality, you’ll need to focus on achieving the right colors using the best cake decorating techniques. Whether you’re using fondant, buttercream, or a combination of both, precision in color mixing, application, and detailing is key to bringing this nostalgic character to life.
1. Choosing the Right Food Coloring for Mona’s Green & Yellow Look
The first step in recreating Mona’s vibrant green skin and yellow tuft of hair is selecting the best food coloring. The type of food coloring you use can impact both the color vibrancy and the texture of your frosting or fondant.
Types of Food Coloring to Use
- Gel-Based Food Coloring: Highly concentrated and produces rich, vibrant colors without making buttercream or fondant too runny.
- Powdered Food Coloring: Ideal for tinting fondant or white chocolate, as it adds color without altering the consistency.
- Liquid Food Coloring: Less effective for strong color saturation, as too much can thin out buttercream or fondant.
For Mona’s signature green skin, use a combination of green and a small amount of yellow gel food coloring to create a bright, warm green shade that closely matches her on-screen appearance.
For her tuft of yellow hair, opt for a golden yellow shade rather than a pale or neon yellow. If needed, mix in a touch of orange food coloring to warm up the yellow and get the perfect color balance.
2. Coloring Buttercream for a Vibrant Base
If you are decorating your Nanalan Cake with buttercream frosting, you’ll need to properly tint it to achieve Mona’s green and yellow color scheme.
Step 1: Creating Mona’s Green Base
- Start with white buttercream frosting as a base.
- Add green gel food coloring a few drops at a time, mixing thoroughly between additions.
- If the color is too cool (blue-toned green), add a small amount of yellow gel food coloring to balance it out.
- Continue mixing until you achieve a bright, Mona-like green that isn’t too dark or dull.
Step 2: Preparing the Yellow Buttercream for Mona’s Hair
- In a separate bowl, start with a base of white buttercream.
- Add golden yellow gel food coloring and mix until fully blended.
- For a richer yellow, add a tiny amount of orange to create warmth.
Step 3: Frosting the Cake in Layers
- Apply the green buttercream as the base layer, covering the entire cake evenly.
- Use an offset spatula or a piping bag to add textured yellow frosting for Mona’s tuft of hair on top of the cake.
For a clean finish, chill the cake for 15-20 minutes after applying the first layer, then add a second coat of buttercream to smooth out imperfections.
3. Achieving a Smooth Green Finish with Fondant
If you prefer a clean, cartoon-like finish, fondant is the best choice for creating Mona’s green skin.
Step 1: Coloring Fondant for Mona’s Face
- Start with white fondant and knead in green gel or powdered food coloring.
- Continue kneading until the color is evenly distributed and the fondant is a smooth, vibrant green.
- If the green appears too dark, mix in a small amount of white fondant to lighten it.
Step 2: Covering the Cake with Fondant
- Roll out the green fondant on a lightly floured surface or silicone mat to prevent sticking.
- Carefully drape the fondant over the cake, smoothing it out with your hands or a fondant smoother.
- Trim off any excess fondant around the base of the cake using a sharp knife or pizza cutter.
Step 3: Adding Mona’s Yellow Hair Using Fondant or Buttercream
- Roll out yellow fondant and cut small tuft-like shapes to mimic Mona’s playful hair.
- Attach them to the top of the cake using a small amount of water or edible glue.
- If using buttercream instead, pipe textured yellow frosting onto the top using a star tip piping nozzle to create a fluffy, hair-like effect.
For an added 3D effect, slightly curl the fondant hair pieces upwards to give Mona’s signature tuft of hair a more dynamic look.
4. Detailing Mona’s Features to Bring the Cake to Life
Once the base colors are in place, it’s time to add depth and character to the cake by creating Mona’s large, round eyes and playful expression.
Step 1: Creating Mona’s Big White Eyes
- Roll out white fondant into two even circles for the base of her eyes.
- Attach them onto the green fondant using a tiny amount of water or edible glue.
Step 2: Adding Black Pupils and Expression Details
- Roll out black fondant into two smaller circles and place them over the white base to form her pupils.
- If desired, add a tiny dot of white fondant on each pupil to create a more animated, reflective look.
Step 3: Outlining Mona’s Mouth and Nose
- Use a thin strip of black fondant or an edible marker to draw Mona’s small, curved mouth.
- If you want a 3D effect, roll out a very thin strip of fondant and apply it along the outline of her smile.
- Lightly shade Mona’s cheeks with a soft pink food coloring dust for a more expressive, lively appearance.
5. Enhancing the Colors for a Cartoon-Like Finish
To make Mona’s green and yellow features pop, consider using these final detailing techniques:
- Airbrushing or Dusting: Lightly apply edible green food dust on the edges of her face to create subtle shading.
- Using Piping Gel for a Glossy Effect: Brush a thin layer of clear piping gel over Mona’s eyes to make them appear more lifelike.
- Fine Detailing with an Edible Marker: Outline key features like Mona’s mouth and hair strands to make them stand out.
Using Buttercream vs. Fondant for the Best Design
When decorating a Nanalan Cake, choosing between buttercream and fondant plays a significant role in achieving the desired visual style and texture. Both options have their advantages and limitations, and the decision ultimately depends on the look you want to achieve, your skill level, and personal preference.
Buttercream provides a soft, textured, and homemade feel, while fondant offers a clean, structured, and professional finish. Below, we’ll explore the differences between buttercream and fondant, their pros and cons, and the best techniques for using each to bring Mona’s face to life on your Nanalan Cake.
1. Buttercream: A Soft, Textured, and Fluffy Look
Buttercream is a classic choice for cake decorating, known for its smooth yet creamy texture. It is made from butter, powdered sugar, and flavoring, making it easy to whip up and work with. If you’re looking to give Mona a soft, animated look with a slightly textured surface, buttercream is an excellent choice.
Pros of Using Buttercream for a Nanalan Cake:
Easier to Apply: Buttercream can be spread with a spatula or piped with a piping bag for various decorative effects.
Better Taste & Texture: Many people prefer the rich, creamy flavor of buttercream over the chewy texture of fondant.
Great for Beginners: Requires less technical skill compared to rolling out and shaping fondant.
More Forgiving for Mistakes: Easy to smooth out, adjust, or reapply if needed.
Cons of Using Buttercream for a Nanalan Cake:
Less Defined Details: Achieving sharp edges and intricate details is harder compared to fondant.
More Challenging to Handle in Warm Climates: Buttercream softens and melts quickly in warm temperatures.
Can Be Crumbly: If the cake is not crumb-coated properly, crumbs may mix into the frosting.
How to Use Buttercream for a Nanalan Cake:
- Step 1: Tinting the Buttercream
- Use gel-based food coloring to achieve Mona’s signature green shade.
- Prepare a separate batch of yellow buttercream for her tuft of hair.
- Step 2: Applying the Base Layer
- Start by applying a thin crumb coat and chill the cake for 20-30 minutes.
- Once the crumb coat sets, apply a second, thicker layer to achieve a smooth, opaque finish.
- Use an offset spatula or a bench scraper to even out the frosting.
- Step 3: Piping for Texture and Facial Details
- Use a round piping tip to pipe Mona’s eyes, mouth, and nose with black buttercream.
- For her hair, use a star piping tip to create a textured, fluffy look.
Buttercream is an excellent option if you prefer a softer, more textured cake or if you want to focus on flavor over structure.
2. Fondant: A Clean, Smooth, and Professional Look
Fondant is a sugar-based dough that can be rolled out and draped over cakes for a flawless, polished appearance. If you’re aiming for a Nanalan Cake that looks exactly like Mona’s smooth, cartoonish face, fondant is the best choice.
Pros of Using Fondant for a Nanalan Cake:
Perfect for Smooth Finishes: Provides a seamless and structured appearance.
Ideal for Mona’s Cartoon Look: The clean edges and flat surface mimic Mona’s animation style.
More Durable in Warm Weather: Holds up better than buttercream in hot or humid environments.
Allows for Detailed Designs: Fondant can be molded, cut, and shaped for intricate facial details.
Cons of Using Fondant for a Nanalan Cake:
Requires More Skill: Rolling and applying fondant takes practice to get right.
Different Texture & Taste: Some people find fondant too chewy compared to buttercream.
Cracks or Tears Easily: If not handled properly, fondant can dry out, tear, or wrinkle.
How to Use Fondant for a Nanalan Cake:
- Step 1: Coloring the Fondant
- Start with white fondant and knead in green gel food coloring until evenly distributed.
- Do the same with yellow fondant for Mona’s hair.
- Step 2: Rolling & Covering the Cake
- Roll out the green fondant on a non-stick mat or lightly dusted surface.
- Carefully lift the fondant and drape it over the cake, smoothing it out using a fondant smoother.
- Trim any excess using a sharp knife or pizza cutter.
- Step 3: Adding Mona’s Facial Features
- Roll out white fondant and cut two large circles for Mona’s eyes.
- Use black fondant for the pupils and outline her mouth with a thin strip of black fondant or an edible marker.
- Attach Mona’s yellow fondant hair pieces at the top for a 3D effect.
Fondant works well if you want a clean, professional finish that resembles a perfect replica of Mona’s cartoon face.
3. Combining Buttercream & Fondant for the Best of Both Worlds
For a balanced approach, many bakers use a combination of both buttercream and fondant. This method provides the taste of buttercream while achieving the smooth look of fondant.
How to Use Both for a Nanalan Cake:
- Use Buttercream as a Base:
- Apply a buttercream crumb coat before adding fondant for a smooth, even surface.
- Decorate Details with Fondant:
- Use fondant for Mona’s facial features, eyes, and hair while keeping the base buttercream.
- Texture Hair with Buttercream:
- Use a piping bag with a star tip to add texture to Mona’s hair instead of using flat fondant pieces.
By combining the two, you get the flavor and softness of buttercream with the precise design elements of fondant.
4. Choosing the Right Option for Your Nanalan Cake
| Feature | Buttercream | Fondant |
|---|---|---|
| Ease of Use | Easier for beginners | Requires skill & practice |
| Texture | Soft & fluffy | Smooth & firm |
| Best for Mona’s Face | Textured, natural look | Cartoon-like precision |
| Best for Hair Design | Piped hair strands | Smooth fondant pieces |
| Taste | Rich & creamy | Sweet but chewy |
| Durability | Softens in heat | Holds up better in warm weather |
If you want a softer, more natural appearance, buttercream is a great choice. If you prefer a precise, cartoon-accurate design, fondant is the way to go. For the best results, using a combination of both allows you to enjoy the taste of buttercream with the clean details of fondant.
Fun Decoration Ideas: Eyes, Hair, and Facial Features
A Nanalan Cake isn’t complete without Mona’s signature facial features, which make her such a recognizable and adorable character. Her big round eyes, tiny mouth, and playful tuft of yellow hair are the defining elements that bring this cake to life. Whether you choose buttercream, fondant, or a combination of both, paying attention to these details will ensure that your Nanalan Cake looks just like Mona from the beloved show.
In this section, we’ll explore different techniques, tools, and creative ideas for designing Mona’s eyes, hair, and other facial features with precision and flair.
1. Creating Mona’s Big, Expressive Eyes
Mona’s eyes are arguably the most important part of her face, as they give her that innocent and playful expression. They are large, round, and white with black pupils, making them a focal point of the cake.
Option 1: Fondant Eyes for a Smooth Cartoon Look
Fondant is the best choice if you want Mona’s eyes to be bold, clean, and well-defined.
- Step 1: Roll out white fondant and cut two large circles using a round cookie cutter or the rim of a small glass.
- Step 2: Roll out black fondant and cut two smaller circles for the pupils.
- Step 3: Attach the pupils to the white circles using a tiny dab of water or edible glue.
- Step 4: For a more animated look, roll out two tiny dots of white fondant and place them on the black pupils to create a shiny, reflective effect.
- Step 5: Position the completed eyes on the cake, making sure they are evenly spaced and symmetrical.
Option 2: Buttercream Piped Eyes for a Soft, Textured Look
If you prefer to keep the cake fully covered in buttercream, you can pipe Mona’s eyes directly onto the frosted cake.
- Step 1: Use white buttercream with a round piping tip to pipe two large circles onto the cake.
- Step 2: Use black buttercream to pipe the pupils inside the white circles.
- Step 3: Add a tiny dot of white buttercream on each pupil to create a light reflection.
Pro Tips for Mona’s Eyes:
✔ Spacing matters – Place the eyes slightly closer together for a more expressive, childlike look.
✔ Use a template – Lightly sketch the placement of the eyes with a toothpick before applying fondant or piping buttercream.
✔ Add depth – Use a thin black edible marker or a fine piping tip to outline the eyes for more definition.
2. Designing Mona’s Signature Yellow Hair Tuft
Mona’s small tuft of yellow hair is a key part of her character design. It sits on the top of her head, slightly curved outward, giving her a cute and playful appearance.
Option 1: Fondant Hair for a Smooth, Structured Look
Fondant works well for creating a defined, sculpted tuft of hair.
- Step 1: Roll out yellow fondant and cut three or four teardrop-shaped pieces to resemble strands of hair.
- Step 2: Slightly curl the edges to give them a wavy, natural look.
- Step 3: Attach the fondant hair pieces to the top of the cake using a dab of water or edible glue.
- Step 4: Use a fondant modeling tool to add slight indentations or texture to the hair strands.
Option 2: Buttercream Piped Hair for a Fluffy, Playful Look
If you want Mona’s hair to have a more natural and fluffy appearance, buttercream is the way to go.
- Step 1: Fill a piping bag with yellow buttercream and attach a star or grass piping tip.
- Step 2: Pipe small clusters of short hair strands onto the top of the cake.
- Step 3: Vary the angles of the piping strokes to create a textured, playful effect.
Pro Tips for Mona’s Hair:
✔ Layer the hair strands – Overlapping some pieces makes the tuft look more natural.
✔ Mix two shades of yellow – Adding a slightly darker yellow for shadows creates more depth.
✔ Use a sculpting tool – For fondant, make small grooves or indentations to mimic natural hair strands.
3. Shaping Mona’s Mouth and Nose
Mona’s tiny curved mouth and simple button nose give her an innocent and curious expression. These details may be small, but they make a big impact in bringing her character to life.
Option 1: Fondant Cutouts for a Crisp, Cartoon-Like Smile
- Step 1: Roll out black fondant and cut a thin, curved strip to form Mona’s smile.
- Step 2: Use a tiny dot of black fondant for Mona’s nose and place it just above her mouth.
- Step 3: Attach the features to the cake using a small amount of edible glue or water.
Option 2: Piped Buttercream for a Soft, Hand-Drawn Look
- Step 1: Fill a piping bag with black buttercream and attach a fine round piping tip.
- Step 2: Pipe a gentle, curved line to create Mona’s small smile.
- Step 3: Pipe a small dot for the nose right above the smile.
Option 3: Edible Marker for an Effortless Cartoon Effect
- Step 1: After the fondant is in place, use a thin, black edible marker to draw Mona’s mouth and nose directly onto the surface.
- Step 2: Outline the edges of the eyes and mouth for a more defined, animated appearance.
Pro Tips for Mona’s Mouth and Nose:
✔ Keep the smile small and subtle – A slight curve is enough to replicate Mona’s expression.
✔ Use a template – Lightly mark the placement with a toothpick before piping or drawing.
✔ Adjust based on expression – You can modify Mona’s mouth to give her a surprised, smiling, or curious look.
4. Extra Decoration Ideas for a More Lifelike Mona Cake
If you want to add extra personality and detail to your Nanalan Cake, here are a few creative ideas:
✔ Blush for a Soft, Cute Look – Lightly dust pink food coloring powder onto Mona’s cheeks for a rosy, animated touch.
✔ 3D Ears for a More Realistic Effect – Add small green fondant pieces to create subtle ear shapes on the sides of the cake.
✔ Textured Skin for a Puppet-Like Effect – If you want the cake to resemble Mona’s felt-like texture, use a stippling tool or a clean sponge to lightly press into the fondant.
If you love fun and playful desserts like Nanalan Cake, you might also enjoy making Mini Pancakes for breakfast or as a creative party treat. These bite-sized pancakes are perfect for stacking, drizzling with syrup, or even decorating with colorful toppings to match your cake theme. Check out our Mini Pancakes recipe for an easy and delicious way to add more fun to your table!